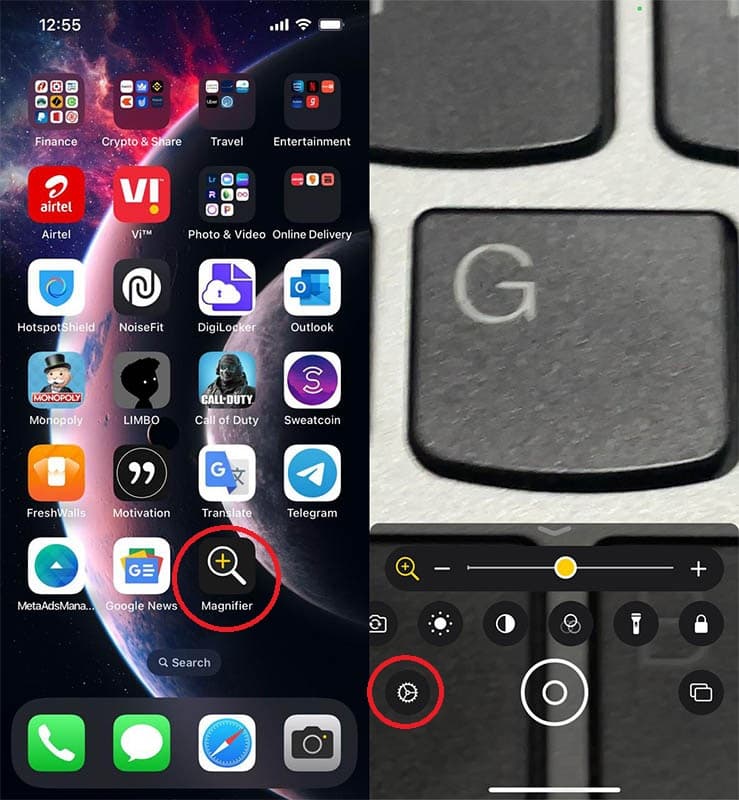
The Magnifier is a visual accessibility feature on your iPhone or iPad that turns your iOS device into a magnifying glass and help you get a closer look at the things around you. Magnifier makes seeing everything from menus to newspapers to instructions easier for anyone with low vision.
In the Magnifier app, you can use your iPhone or iPad as a magnifying glass to zoom in on objects near you.
The iPhone’s Magnifier App
With the Magnifier app, you can turn your iPad or iPhone into a magnifying glass so you can zoom in on objects or text near you. It uses your device’s built-in camera to enlarge objects or text so you can view them more easily.

The app lets you increase the zoom level and turn on the flashlight to better display text and objects. You can also adjust the image contrast and brightness, and apply color filters. Also, there’s the option to freeze one or more frames to review them.
Note: The quality of the Magnifier, including how closely it can focus on objects and text, will vary relying on the quality of the camera in your iPhone or iPad.
How To Turn On Magnifier on iPhone and iPad [Shortcut]
The Magnifier is available as a standalone app or as an Accessibility shortcut on iPhones and iPads. If you happen to delete the app and want it back, you can download it from the App Store.
By default, Magnifier is not enabled as a shortcut. Here’s how to turn on the Magnifier in your iPhone or iPad’s Accessibility settings as a shortcut. Simply follow the below-mentioned steps:
- On your iPhone or iPad, go to Settings > Accessibility.
- Scroll down and select Accessibility Shortcut.
- Tap Magnifier, then turn it on.

Once enabled, just triple-press the Side button or Home button (if your iPhone or iPad has one) to start it up. You may have to choose Magnifier if you have numerous accessibility options enabled.
Note: The above-mentioned steps work when opening the Magnifier either through the official app or as a shortcut. The steps are the same regardless of your selection.
How To Quickly Access Magnifier on iPhone and iPad
To quickly open Magnifier on iPhone or iPad, follow the below-mentioned steps:
- On an iPhone X and later, or iPad without a Home button: Triple-click the Side button on your iOS device. Then drag the slider to adjust the magnification level. To close the Magnifier, swipe up from the bottom of your screen.
- On an iPhone 8 and earlier, and iPad models with a Home button: Triple-click the Home button. Then drag the slider to adjust the magnification level. To close the Magnifier, press the Home button.
You can also add a Magnifier to Control Center: Here’s how to do it:
- Go to Settings > Control Center.
- Then tap Customize Controls.
- Tap the add button next to Magnifier.
- Then from Control Center, tap the Magnifier button to use it.

How To Customize Controls in Magnifier on iPhone and iPad
The default setup of the Magnifier’s controls will be more than adequate for most iPhone owners; however, it is possible to customize how they appear on your screen. To customize controls in Magnifier on iPhone or iPad, follow these steps:
- Launch the Magnifier app on your iPhone or iPad. You can also triple press the Side or Home buttons to get to the Magnifier.
- Tap the cog-shaped Settings button in the bottom left. It looks like a gear icon.

- Tap the red minus (-) button to remove secondary controls or the green plus (+) button to add them.
- Touch and drag the handles on the right to rearrange the order that the controls appear in.
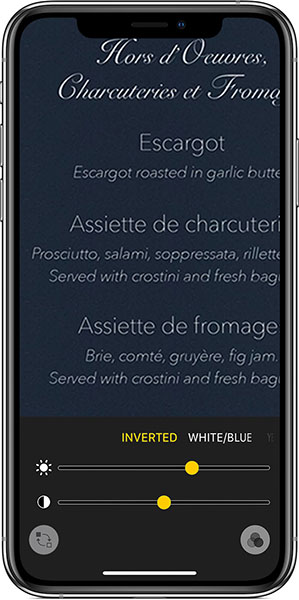
- Tap Filters to choose which filters and inverted filters you want to use regularly.

- Tap Done to save your changes.
How To Use Magnifier on iPhone and iPad
When you have Magnifier open on your iPhone or iPad, you can do things like save a magnified object as an image or apply color filters. You can use the flashlight on your iOS device to add more light to an object you’re trying to magnify.
You can also turn on Auto-Brightness to adjust the brightness of Magnifier based on ambient light settings.
Things You Can Do in Magnifier
- Apply a color filter in Magnifier
- Save a magnified object as an image
- Enable Multi-Photo Mode in Magnifier
- Manually adjust the brightness and contrast in Magnifier
- Take a freeze-frame in the Magnifier
- Turn on the flashlight in the Magnifier
- Zoom in with the Magnifier
How To Apply Color Filter in Magnifier on iPhone and iPad
To apply color filters in Magnifier on iPhone or iPad, follow these steps:
- Tap the filters button.
- Swipe across the different color filters to view their effects.
- None
- Grayscale
- Red on Black
- Yellow on Black
- Yellow on Blue
- White on Blue
- Inverted
- Inverted Grayscale
- Black on Red
- Black on Yellow
- Blue on Yellow
- Blue on White
- To adjust the brightness and contrast, drag the sliders.
To invert the colors in Magnifier on iPhone or iPad, follow these steps:
- Tap the invert filters button .
- Tap the filter button again to apply the filter you want and to return to the Magnifier screen.

How To Save A Magnified Object as an Image on iPhone and iPad
To save a magnified object as an image on iPhone or iPad, follow these steps:
- To freeze a specific frame, tap the freeze frame button.
- To adjust the magnification, drag the slider.
- Tap the screen to focus on the image.
- To save the image, touch and hold the image, then tap Save Image.

To unfreeze the frame, tap the freeze frame button again. To lock the focus of the object you’re trying to magnify, tap the lock button. Tap the button again to unlock the focus.
How To Enable Multi-Photo Mode in Magnifier on iPhone and iPad
Multi-photo mode is a feature in Magnifier that enables the ability to take multiple freeze frames and view them instead of just a single one. Any freeze frames taken in this mode are not saved to your Camera Roll of your iPhone or iPad, and you can go back to Single Photo Mode at any time.
Here’s how to enable multi-photo mode in Magnifier on iPhone and iPad:
- Launch the Magnifier app on your iPhone or iPad. You can also triple press the Side or Home buttons to get to the Magnifier.
- In the bottom right, tap the Multi-Photo Mode button.
- Add as many freeze frames as you need.
- Tap View to view your freeze frames and make adjustments as you see fit.
- Tap the plus (+) button to return to Multi-Photo Mode.
- Tap End in the top left to go back to Single Photo Mode.

How To Manually Adjust Brightness and Contrast in Magnifier on iPhone and iPad
- Launch the Magnifier app on your iPhone or iPad. You can also triple press the Side or Home buttons to get to the Magnifier.
- Tap the brightness (it looks like a sun) or contrast (a circle with two halves) buttons.
- Tap, hold, and drag the sliders to adjust brightness and contrast to your needs.

How To Take A Freeze-frame in the Magnifier on iPhone and iPad
You can freeze one or more frames and review them. To take a freeze-frame in the Magnifier on iPhone or iPad, follow these steps:
- Launch the Magnifier app on your iPhone or iPad. You can also triple press the Side or Home buttons to get to the Magnifier.
- Tap the Freeze Frame button at the bottom center of the screen. It is a large circle with a smaller circle inside it and looks similar to the camera shutter button.

- You can drag the zoom slider to adjust magnification on this freeze frame, or use any other Magnifier tools.
- Tap the Freeze Frame button again (now with an “X“) to return to the live Magnifier.
Note: Freeze frames aren’t saved to Photos.
How To Turn On Flashlight in the Magnifier on iPhone and iPad
To turn on the flashlight in the Magnifier on iPhone or iPad, follow these steps:
- Launch the Magnifier app on your iPhone or iPad.
- You can also triple press the Side or Home buttons to get to the Magnifier.
- Underneath the zoom slider, tap the Flashlight button. (Looks like a flashlight.)

How To Zoom in With Magnifier on iPhone and iPad
To zoom in with Magnifier on iPhone or iPad, follow these steps:
- Launch the Magnifier app on your iPhone or iPad.
- Also, you can also triple press the Side or Home buttons to get to the Magnifier.
- Tap, hold, and drag the slider to adjust magnification — left to decrease and right to increase magnification.

Conclusion
Magnifier – a great tool is just of the many Accessibility tools available on iOS devices like iPhone and iPad. Use it to bring physical objects much closer, just as you would an actual magnifying device.
Learn More:
- How To Detect People Around You Using Magnifier on iPhone and iPad
- How To Set Up and Use Back Tap on iPhone To Take Screenshot
- How To Turn On Privacy Screen on iPhone and iPad
via ©GadgetsBeat.


ليست هناك تعليقات:
إرسال تعليق