All Apple products including the iPad and iPhone are designed to protect your privacy. Built-in security features help prevent anyone but you from accessing the data on your device and in iCloud. Built-in privacy features minimize how much of your information is public to anyone but you, and you can adjust what information is shared and where you share it.
But, if you are tired of your friends and family members who always snoop around your iPhone or iPad, a privacy screen on the iPhone or iPad can create extra seclusion and assist in hiding your confidential data and information from the watchful eyes of prying individuals.
If you have already applied a privacy screen protector on your iPhone or Ipad, but want to go the extra mile of securing your information and data, then there are a few settings tweaks you can make on your iPhone and iPad running iOS.
In this blog post, let us learn about how to turn on the privacy screen on iPhones and iPad to take control of your iOS device by protecting your data and information stored on it.
Also Read: How to Reset Network Settings on iPhone, iPad, and iPod
How To Turn On Privacy Screen on iPhone and iPad?
The best way for creating privacy screen functionality on iPhone or iPad is to keep all your apps locked which are installed on the device. However, unlike Android devices, iOS devices do not have a direct option to lock apps. Nevertheless, you can still apply a few workarounds for fixing this issue. Like, you can use guided access, shortcuts, limit screen time, and more.
So, to take maximum benefit of the security and privacy features built into the iPhone and iPad, follow the below-mentioned practices.
Before we start the app lock methods on iPhones and iPads, make sure you already have a lock screen passcode set up for your iOS device. We recommend you make a strong pin code that is not easy or predictable to hack your iPhone or iPad. Also, depending on your iPhone/iPad model, you can access Face ID or Touch ID. So, you can have these features enabled for easier access.
Create and Set a Strong Passcode for iPhone or iPad
For better security, creating and setting a strong passcode to unlock iPhone or iPad is the most important thing you can do to safeguard your device. A passcode needs to be entered to unlock iPhone/iPad when you turn it on or wake it.
Setting a passcode also turns on data protection, which encrypts your iPhone or iPad data with 256-bit AES encryption. (Some apps may opt-out of using data protection.)
How To Create, Set or Change a Passcode on iPhone and iPad
Here are the steps you can follow to create, set, or change a passcode on iPhone and iPad.
- Go to Settings, then do one of the following:
- On an iPhone with Face ID: Tap Face ID & Passcode.
- On an iPhone with a Home button: Tap Touch ID & Passcode.
- Tap Turn Passcode On or Change Passcode.
To view options for creating a password, tap Passcode Options. The most secure options are Custom Alphanumeric Code and Custom Numeric Code. - After you set a passcode, you can use Touch ID or Face ID to unlock your iPad or iPhone (depending on your model).
For additional security and privacy, however, you must always enter your passcode to unlock your iPhone or iPad under the following conditions:
- You turn on or restart your iPhone or iPad.
- You haven’t unlocked your iPhone or iPad for more than 48 hours.
- You haven’t unlocked your iPhone or iPad with the passcode in the last 7 days, and you haven’t unlocked it with Touch ID or Face ID in the last 4 hours.
- Your iPhone or iPad receives a remote lock command.
- There are five unsuccessful attempts to unlock your iPhone or iPad with Touch ID or Face ID.
- An attempt to use Emergency SOS on iPhone or iPad is initiated (see Make emergency calls on iPhone).
- An attempt to view your Medical ID on your iPhone or iPad is initiated (see Create a Medical ID).
How To Turn Off Passcode on iPhone and iPad
Here are the steps you can follow to turn off the passcode on your iPhone and iPad.
- Go to Settings, then do one of the following:
- On an iPhone with Face ID: Tap Face ID & Passcode.
- On an iPhone with a Home button: Tap Touch ID & Passcode.
- Tap Turn Passcode Off.
How To Reset Passcode on iPhone and iPad
If you enter the wrong passcode six times in a row on your iPhone or iPad, you’ll be locked out of your iOS device, and you’ll receive a message that says iPhone is disabled. If you can’t recall your passcode, you can erase your iPhone or iPad with a recovery mode or with a computer, then set a new passcode. (If you made an iCloud or computer backup before you forgot your passcode, you can restore your settings and data from the backup.)
See this article, If you forgot the passcode on your iPhone, or your iPhone is disabled.
Use Touch ID or Face ID On iPhone and iPad
Touch ID or Face ID provides a secure and convenient way to unlock your iPhone or iPad, authorize purchases and payments, and sign in to many third-party apps securely. See Set up Face ID on iPhone or Set up Touch ID on iPhone.
Turn on Find My iPhone
Find My helps you to find your iPhone, iPad, MacBook, and other iOS devices if it’s lost or stolen and prevents anyone else from activating or using your device if it’s missing. See Add your iPhone to Find My.
Keep Your Apple ID Secure
Your Apple ID is the account you use to access Apple services like Apple Music, App Store, iCloud, FaceTime, iMessage, and more. Your Apple account includes the email address and password you use to sign in as well as the contact, payment, and security details you use across Apple services. Apple employs industry-standard practices to safeguard your Apple ID.
Add Account Recovery Contacts
Choose one or more people you trust as Account Recovery Contacts to help you reset your Apple ID password and regain access to your account if you ever forget your password or get locked out.
Following are the steps on how to add account recovery contacts on iPhone and iPad:
- Go to Settings.
- Then tap on [your name]
- After that, tap on Password & Security.
- Now, tap on Account Recovery.
- Now, tap on Add Recovery Contact, then follow the onscreen instructions.

For more information, go to Settings > [your name] > Password & Security, then tap “Learn more” below Add Recovery Contact.
Hide Default Apple Apps on iPhone and iPad
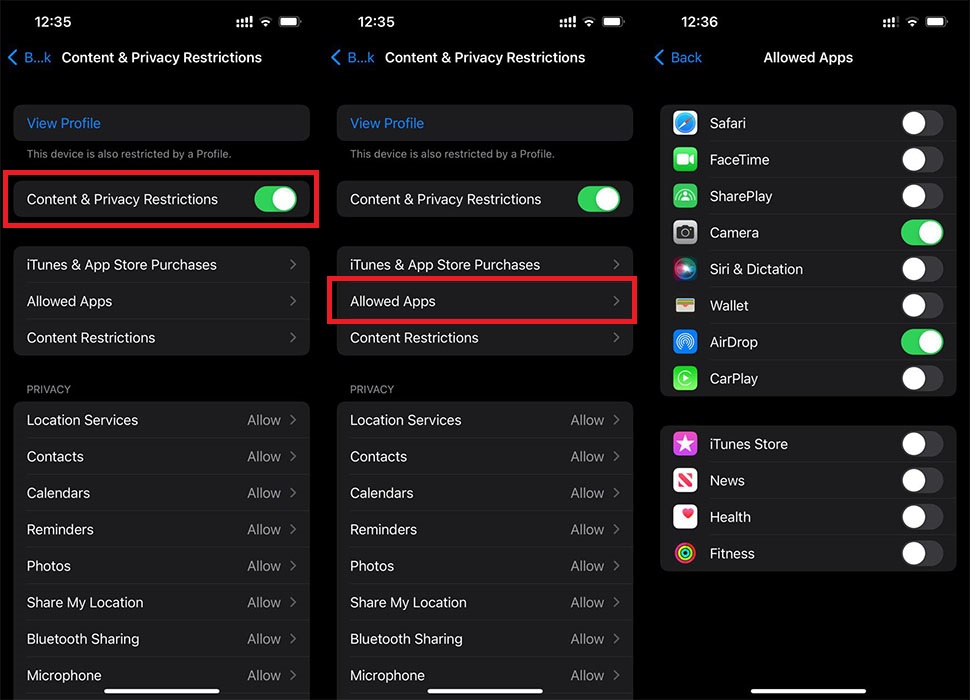
If you want to hide the default Apple apps on your iPhone or iPad, then enabling the content and privacy restrictions feature can be the perfect method for you to apply.
Using this method is a bit different in comparison to locking apps. After disabling the default apps from this setting, you will not see it on your device even if you do a thorough search.
How To Hide Default Apple Apps on iPhone and iPad
Follow the below-mentioned step-by-step guide on how to hide default apps on your iPhone or iPad:
On devices running iOS 12 or higher versions:
- Go to Settings.
- Tap on the Screen Time option.
- If you have not enabled screen time, tap on Turn on Screen Time and follow the on-screen instructions.
- Now scroll down and tap on Content & Privacy Restrictions.

- Enable the toggle for Content and Privacy Restrictions.
- Then, tap on the Allowed Apps option.
- Disable the toggle for the app you want to hide from your device.

That’s it. Now, exit out of the Settings to see the changes.
On devices running iOS 11 or older versions:
- Go to Settings.
- Scroll down and tap on General.
- Now, scroll down again and tap on the Restrictions option.
- Enable by switching the toggle for Restrictions.
- Enter in a new password and re-enter to confirm the passcode.
Enable Guided Access on iPhone and iPad
Guided Access is a feature that allows you to keep your iPhone or iPad within a single app. As a result, it makes tiptoeing into your other apps impossible if you don’t have the needed passcode, Touch ID, or Face ID to exit out of this function. So, to enable the guided access feature on iPhone or iPad, here is what you need to do.
How To Set Up Guided Access on iPhone or iPad
- Go to Settings > Accessibility > Guided Access, then turn on Guided Access.
- Adjust any of the following:
- Passcode Settings: Tap Set Guided Access Passcode, then enter a passcode. You can also turn on Face ID (on an iPhone with Face ID) or Touch ID (on an iPhone with a Home button) as a way to end a Guided Access session.
- Time Limits: Play a sound or speak the time remaining before a Guided Access session ends.
- Accessibility Shortcut: Turn the shortcut on or off during Guided Access sessions.
- Display Auto-Lock: Set how long it takes the iPhone to automatically lock during a Guided Access session.
How To Use Guided Access on iPhone or iPad
Guided Access helps you stay focused on a task by temporarily restricting iPhone or iPad to a single app, and allowing you to control which app features are available. You can do any of the following:
- Disable areas of the screen that aren’t relevant to a task, or areas where an accidental gesture might cause a distraction.
- Disable the iPhone/iPad hardware buttons.
- Limit how long someone can use the app.
Follow the below-mentioned steps to start a Guided Access session on iPhone or iPad
- Open the app that you want to use.
- On an iPhone X or later, triple-click the side button. On an iPhone 8 or earlier, triple-click the Home button.
- If you want parts of your screen to stop responding to touch, use one finger to circle those areas. You can move or resize the circle, or tap the X to remove it.
- Tap Guided Access, then tap Start.
Or to start a Guided Access session with Siri, open the app that you want, then tell Siri “Turn on Guided Access.”
Follow the below-mentioned steps to stop or end a Guided Access session on iPhone or iPad
- On an iPhone with Face ID: Double-click the side button, then unlock with Face ID (if enabled). Or triple-click the side button, then enter the Guided Access passcode.
- On an iPhone with a Home button (Touch ID): Double-click the Home button, then unlock with Touch ID (if enabled). Or triple-click the Home button, then enter the Guided Access passcode.
Use Shortcuts
Alternatively, another way to lock apps on iPhone or iPad is to create shortcuts that automate automatic locks when entering a specific app. You can initiate this process in single and multiple apps. This process is easy to follow as you only have to configure it in shortcut settings and adjust them in your clock app. Here is how you can do it.
How To Create App Lock Shortcut on iPhone or iPad
Follow the below steps to create an app lock shortcut on iPhone and iPad:
- Locate and launch the Shortcuts app from your device.
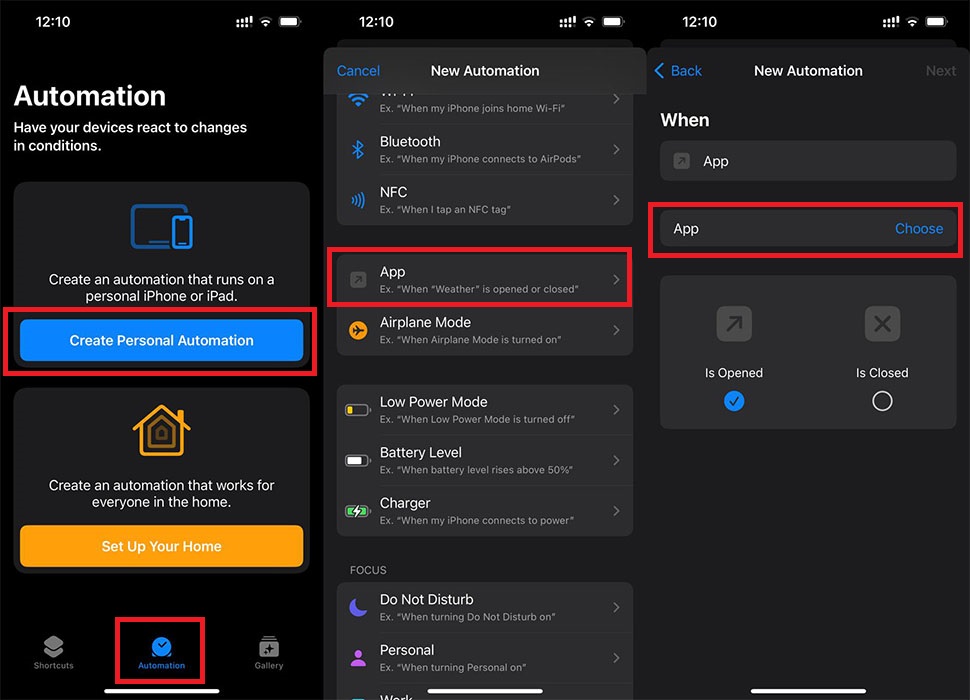
- Switch to the Automation tab and tap on the Create Personal Automation button.
- Scroll down and tap on the App > Choose (Select the apps you want to lock).

- Once you have chosen the app, click on the Done button.
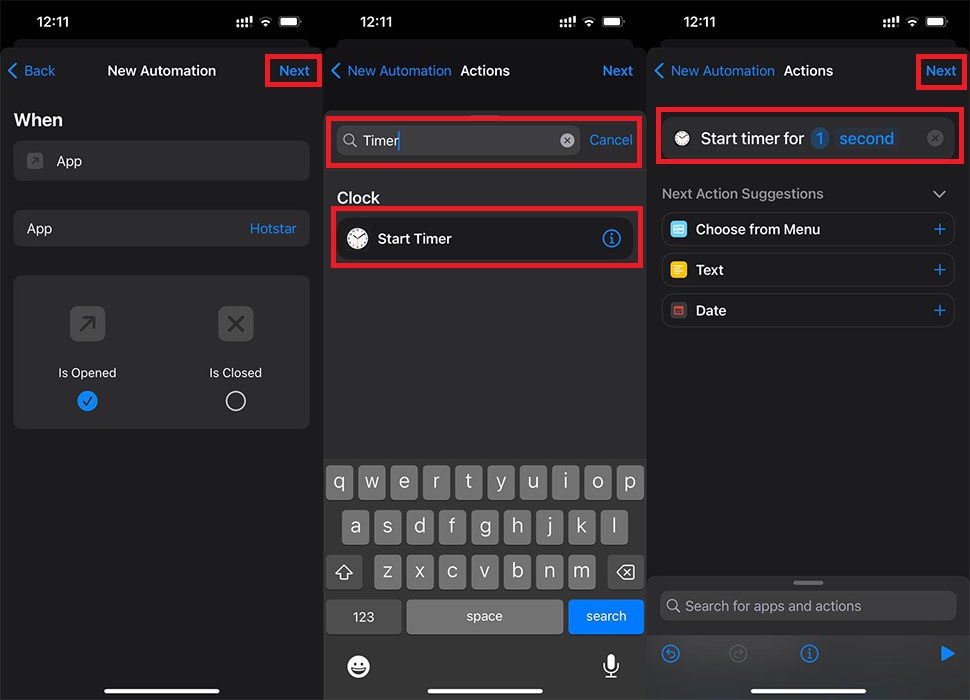
- From the top-right corner of your screen, tap on Next > Add Action.
- Now, from the search box, type in Timer.
- Select the Start Timer option from your results and change the time to 1 second from the drop-down options and hit the Next button.

- Turn off the toggle for Ask Before Running > Done.
Configure in Clock App
After the automation is set up, follow the below-mentioned steps:
- Open the Clock app on your iPhone or iPad.
- Switch to the Timer tab located at the bottom section.
- In the When Timer Ends section, tap and scroll down to the bottom and select the Stop Playing option.
- Finally, click on the Set button to apply the changes.

Now, go to the app you just locked via shortcuts for testing. It will briefly open for a second but will immediately lock your iPhone or iPad. So, to access it, you will have to unlock your iOS device by either Touch ID, Face ID, or Passcode.
Enable Screentime Limits
If you want to allocate a specific time frame to use certain apps, then enabling a screentime limit on iPhone or iPad can be extremely helpful. After the set time has expired, your iOS device will be locked, and you’ll be asked to enter the passcode to continue using the app. Here is how you can enable screentime limits on iPad or iPhone.
How To Enable Screentime Limits on iPhone and iPad
- Go to Settings.
- Tap on the Screen Time option.
- Scroll down and tap on Use Screen Time Passcode. Now enter in your Passcode and re-enter to confirm it.

- Now enter in your Apple ID and Password and tap OK.
- Scroll up and tap on App Limits > Add Limit and enter in your Screen Limit Passcode.
- Now, tap the category and select the app you want to lock.

- Tap on the Next button. Set the timer to 1 minute.
- Now, ensure that the toggle for Block at end of Limit is turned on.
- Finally, tap on the Add to apply the changes.

Note: If you do forget your screen time passcode, you can use your Apple ID to reset it.
Use Built-in App Settings
On App Store, some apps come equipped with a privacy screen feature built-in to their system. These apps include WhatsApp, Google Drive, PayPal, Outlook, and most finance or banking apps. Finding the privacy screen feature will require scouring the app’s settings, and you will likely be able to configure it with a Passcode, Face ID, or Touch ID.
Use Third-Party Applications
Another way to secure your iOS device is to install third-party apps on your iPhone and iPad. Some of the more popular apps are Bio-Protect and AppLocker. Nonetheless, with these apps, you will have to jailbreak your iPhone or iPad which can put your iOS devices at more risk. So, please only use these options as a last resort.
Conclusion
I hope you find our article on how to turn on the privacy screen on iPhone and iPad helpful. If you have any questions regarding the same, do let us know in the comments below.
Frequently Asked Questions (FAQ)
How to end a Guided Access session?
To end the Guided Access session, triple-click the Side or Home button, enter your Guided Access passcode, then tap End. Or if you turned on Touch ID or Face ID for Guided Access, double-click the Side or Home button.
How to end a Guided Access session on an iPhone with a Face ID?
On an iPhone with Face ID: Double-click the side button, then unlock with Face ID (if enabled). Or triple-click the side button, then enter the Guided Access passcode.
How to end a Guided Access session on an iPhone with a Touch ID?
On an iPhone with a Touch ID (Home button): Double-click the Home button, then unlock with Touch ID (if enabled). Or triple-click the Home button, then enter the Guided Access passcode.
via ©GadgetsBeat.


No comments:
Post a Comment